Have you edged an Appliqué before? Would you like to do it yourself?
 |
| Sara Arts - Handmade Cotton Appliques |
Here I will show you how to decorate a table towel with one of my Appliqué.
You will find it easy and extremely fast.
 |
| Sara Arts - D.I.Y. How to sew an applique |
All what you need is: your iron, an old cotton cloth, some water,
a basic sewing machine or instead needle and thread.
 |
| Sara Arts - D.I.Y. How to sew an applique step 1 |
I really love my new cheerful cotton appliqués, I have realized them recently,
and now I would like to dress a white towel with one of them.
 |
| Sara Arts - D.I.Y. How to sew an applique |
Today I play with “Die Birne”.
In the image below you can see my appliqué both sides.
I add to all my appliqués backsides: Vliesofix® , that will help you to sew the final edge easily.
In the image below you can see my appliqué both sides.
I add to all my appliqués backsides: Vliesofix® , that will help you to sew the final edge easily.
 |
| Sara Arts - Die Applikationen - handmade crocheted appliqués |
Vliesofix® is adhesive on both sides. It looks like a transparent net with backing paper
and add special glue to your fabrics in order to fix them where you like more.
I am sure lots among you already know it,
otherwise have a tour in Vlieseline web site and read more.
In order to remember the right position on the towel several pins help me in this job!!!!
Until I do not remove the backing paper I can move my appliqué on the fabric
to check the right position.
This image shows you where I would like to fix it.
The corner is perfect!!!!!
 |
| Sara Arts - D.I.Y. How to sew an applique step 2 |
In order to remember the right position on the towel several pins help me in this job!!!!
 |
| Sara Arts - D.I.Y. How to sew an applique step 2 |
 |
| Sara Arts - D.I.Y. How to sew an applique step 3 |
 |
| Sara Arts - D.I.Y. How to sew an applique step 4 |
Now it is time to prepare the damp cloth.....
 |
| Sara Arts - D.I.Y. How to sew an applique step 5 |
and remove the backing paper
from “Die Birne” backside.
 |
| Sara Arts - D.I.Y. How to sew an applique step 6 |
Thanks to the pins I put my appliqué in the required position.
Great work pins!!!
 |
| Add caSara Arts - D.I.Y. How to sew an applique step7 |
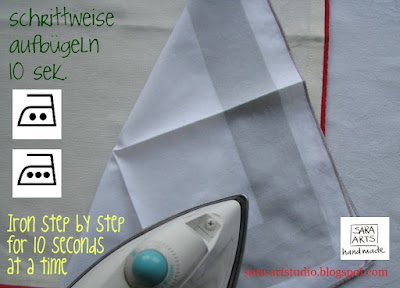
I remove all the pins,
cover "Die Birne" with the damp cloth and
iron pressing down step by step 10 seconds at a time.
cover "Die Birne" with the damp cloth and
iron pressing down step by step 10 seconds at a time.
 |
| Sara Arts - D.I.Y. How to sew an applique step 8 |
The iron temperature must be medium or high.
 |
| Sara Arts - D.I.Y. How to sew an applique step 9 |
Let's leave the fused parts flat and allow them to cool for about 20 minutes.
 |
| Sara Arts - D.I.Y. How to sew an applique step 10 |
Finally I edge the appliqué with zig-zag stitching.
I use a sewing machine to realize it,
I use a sewing machine to realize it,
but if you prefer or do not have one:
"Use needle and thread"
"Use needle and thread"
 |
| Sara Arts - D.I.Y. How to sew an applique step 11 |
This is how sew a appliqué in few steps,
I hope you will find my D.I.Y. clear and useful
and see you soon!!!!!
and see you soon!!!!!
love,
xx
Sara


No comments:
Post a Comment
Thanks to take your time and send me a comment. I will replay to you soon, come back and read my message.
If you like you may follow Sara Arts also via Facebook and Google+, join me and be connect. Help each other to spread out our love for Creativity and Arts!!!
If you are a blogger too, I look forward to have a tour in your "little world".
I love to hear from you!!!!
Xx
Sara Arts